How to reading images from Excel Sheet using phpExcel ? Ya its very interesting and useful, An attached image of excel can be read and upload to server directory is, simplifying the file upload too.
Ok lets check how can we reading images from Excel Sheet using PHPExcel. Here I’am using PHPExcel Version PHPExcel 1.7.9 . There are two readers that supports Image reads facility right now from PHPExcel API. The reading of Excel cells data using PHP is simple and many example can be found on PHPExcel API Official sites.
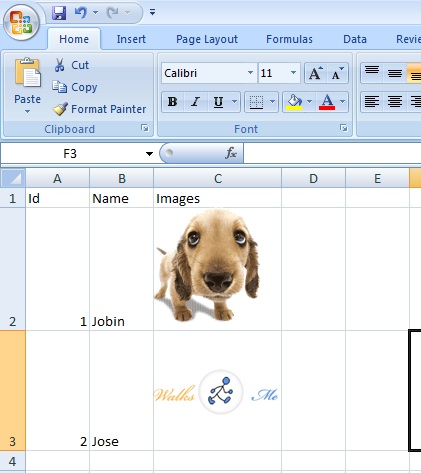
Reading Images From Excel Sheet Using PHPExcel
Lets start with reading images from Excel Sheet using PHPExcel with 2007 reader class XLSXwill be as follows.
$xlsFile = 'sample.xlsx';
require_once 'PHPExcel/Reader/Excel2007.php';
$objReader = new PHPExcel_Reader_Excel2007();
//$objReader->setReadDataOnly(true);
$data = $objReader->load($xlsFile);
$objWorksheet = $data->getActiveSheet();
foreach ($objWorksheet->getDrawingCollection() as $drawing) {
//for XLSX format
$string = $drawing->getCoordinates();
$coordinate = PHPExcel_Cell::coordinateFromString($string);
if ($drawing instanceof PHPExcel_Worksheet_Drawing){
$filename = $drawing->getPath();
$drawing->getDescription();
copy($filename, 'uploads/' . $drawing->getDescription());
}}
The above codes simply reads the images from each row and save to the “uploads” directory. Here one common question will arise what about all the rows don’t have images then How you guys save images to the corresponding rows right ? Have to get row and column index.
print_r($coordinate) ; //will return cols and rows index for the above case so you can create an array of list with these index.
Ok lets check How to read Images from Excel Sheet using PHPExcel in XLS formart 2005 reader.
$xlsFile = 'test.xls';
require_once 'PHPExcel/Reader/Excel5.php';
$objReader = new PHPExcel_Reader_Excel5();
//$objReader->setReadDataOnly(true);
$data = $objReader->load($xlsFile);
$objWorksheet = $data->getActiveSheet();
foreach ($objWorksheet->getDrawingCollection() as $drawing) {
//for XLSX format
$string = $drawing->getCoordinates();
$coordinate = PHPExcel_Cell::coordinateFromString($string);
if ($drawing instanceof PHPExcel_Worksheet_MemoryDrawing) {
$image = $drawing->getImageResource();
// save image to disk
$renderingFunction = $drawing->getRenderingFunction();
switch ($renderingFunction) {
case PHPExcel_Worksheet_MemoryDrawing::RENDERING_JPEG:
imagejpeg($image, 'uploads/' . $drawing->getIndexedFilename());
break;
case PHPExcel_Worksheet_MemoryDrawing::RENDERING_GIF:
imagegif($image, 'uploads/' . $drawing->getIndexedFilename());
break;
case PHPExcel_Worksheet_MemoryDrawing::RENDERING_PNG:
case PHPExcel_Worksheet_MemoryDrawing::RENDERING_DEFAULT:
imagepng($image, 'uploads/' . $drawing->getIndexedFilename());
break;
}
}
}
Yes Done ! Reading images from Excel Sheet using PHPExcel with XLSX and XLS format with 2007 and 2005 reader are just simply like above codes. If you have any issue or thoughts regarding the functionality just comment below..